How to Blog using Microsoft Office365
Recently, I posted one of the articles about using Microsoft Office 365 for configuring my office on the cloud and shared some of the very unique features of it.
There I told you about one of the very unique features of Office 365, which is its capability to directly publish your article to your blogger, WordPress, Typepad, and other blogs. This is the feature that I like the most from a blogger’s point of view and today will share an article on how you can directly publish posts to a WordPress blog from Microsoft Office365.

Steps to Publish Article using Office 365
To publish your article form Microsoft office 365 to your blog (WordPress, Blogger,TypePad etc.), just follow below simple steps.
1. Write a good post for your blog in Microsoft Office365. 🙂
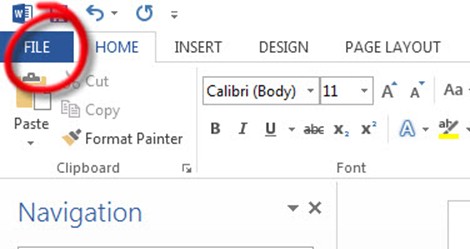
2. Now click on File on left hand side (Top corner).
3. Go to Share and click Post to Blog.
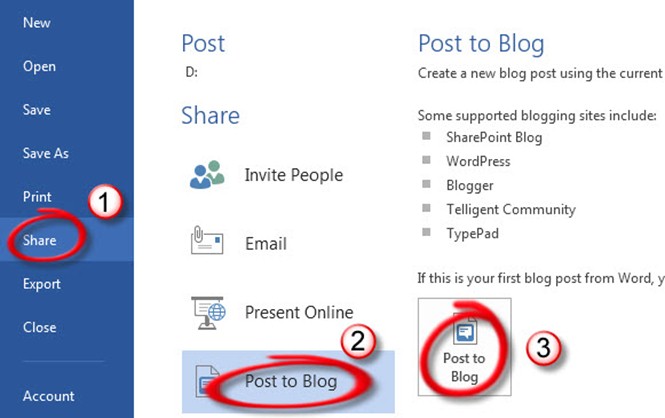
4. Now you will see blogging platforms that are supported by Office 365, here click on Post to Blog as shown above.
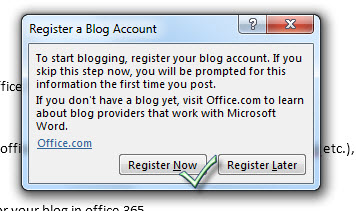
5. Now you will is Register a Blog Account dialog box, click on Register Now.
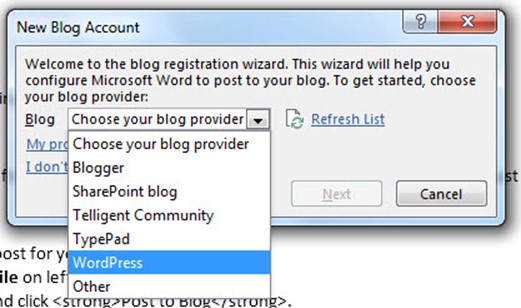
6. Now in this step, just choose your blogging platform, here we are choosing WordPress and click next.
7. Here you will have to enter your blog URL with your login credentials after which you will get an account successful registration message.
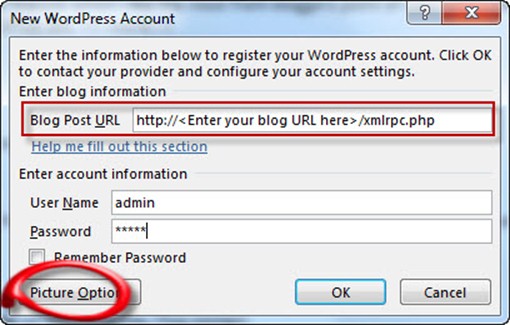
Tip : Use picture option to directly upload pictures from your post document to your blog. Click on picture option and choose My Blog provider on picture provider.
8. Now you will see that you have new option to publish your blog on new word document. Here I will suggest using Publish as a draft option, so that you can optimize the post before publishing it.
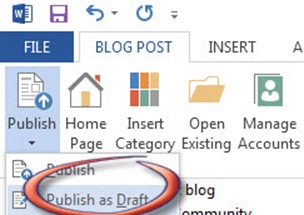
After you publish the post, Microsoft Office365 may ask for your WordPress login details again, so provide it and wait for post to publish. Now you can login to your WordPress account to verify that the post has been published or saved to drafts.
Similarly, you can connect and manage your blogger’s account with Office365 and can directly publish posts with its help.
I really enjoyed typing in Office365 and even this post I have written and published from the Office365 platform itself and had no issues.
Recommended Article: Cheapest WordPress Hosting
Features of Microsoft Office365 Blogging Platform
1. Popular blogging platform support like Blogspot, WordPress, Typepad and others.
2. Directly publish the post or save it to drafts for later.
3. Easy insertion of pictures, charts, shapes, smart art, hyperlinks, Word art, screenshots, etc.
4. Picture tool within the post to modify and style your images.
5. Variety of picture effects.
6. Easy option to insert category directly from your blog.
7. Unique feature of importing and editing old blog posts.
Where to Buy Microsoft Office 365?
Apart from blogging, Microsoft Office365 has a lot more features and functions. You can manage whole your office with this awesome software on the cloud. If you want to try Microsoft Office365, then you can purchase a 1-year subscription for 5 PCs (Windows & MAC) only for Rs.3999 from Flipkart.com and for $99.99 from Amazon.
Hope you have enjoyed reading this tutorial and I’m sure you will use Office365 for blogging and will create awesome posts with the power of Office365.
If you like this post please consider sharing it with your other blogger friends. If you have any issues regarding the setup of Microsoft Office365 or managing your blogging platform, then please leave a comment here or on our Facebook, and will surely try to help you.


Wow what a great feature.. That’s really awesome.. Big thanks for that nice step by step tutorial.. I will try this for the next posts on my website.. Good work!
Really appreciate that you like this article. Surely try Microsoft Office365, it is nice tool for blog publishing.
I can’t publish from Word (Office 365) to any blog, I’ve tried blogger and wordpress and can not find any relevant help online. There is some dated help online but it’s not relevant. My problem is that after I fill in the information of my blog user name etc – Word displays this error message : “Word cannot register your account” I’ve tried both blogger and wordpress and it doesn’t work. Please help me out if you can? Thanks.
Have you check your firewall setting, may be your antivirus is blocking Office 365 to communicate.
I’m having the same issue. Tried turning off my firewalls (at router and in Windows). Windows cannot register, nor can they provide any useful help. One thing I noticed and not even mentioned (conveniently missing) is that if you don’t have at least the small business version you cannot use SharePoint network features. I wonder if this is related.
This should not be the firewall issue I suppose. And Joe it has nothing related to Business version. I am using Home premium and it is working perfectly fine.
Good luck 🙂
Thanks for reading. This is old article.
Good luck 🙂