How to Take a Cropped Screenshot on Mac: 2 Methods
In this article, we will discuss how to take a cropped screenshot on Mac by using Mac’s default shortcut key “command+shift+4″ and the useful software Cleanshot X from SetApp.
Taking a screenshot is useful for capturing images from your Mac’s screen to share information, collaborate on projects, create tutorials, and more.
While you can take a full standard screenshot on a Mac using keyboard shortcuts, getting a cropped or selected portion of your screen requires a different shortcut or app.

Table of Contents
Let’s see 2 simple methods to take cropped screenshot on Mac.
Method 1: Mac Default Shortcut (command+shift+4)
The default method built into your Mac’s system is both quick and efficient. By mastering keyboard shortcuts, you can capture a cropped screenshot in seconds.
Step 1: Identify the Target Area
Identify the specific area of your screen you wish to capture. Whether it’s a portion of a webpage, an error message, or a section of an image, ensure it’s visible on your screen.
Step 2: Shortcut Activation
Press “command + Shift + 4" simultaneously. Your cursor will transform into a crosshair pointer.
Step 3: Select and Capture
Click and drag the crosshair cursor around the area you want to capture. Upon release, you’ll hear a camera shutter sound, indicating the successful capture. The cropped screenshot will be saved to your desktop by default.
Pros
- Speed and Accessibility: With simple keyboard shortcuts, you can swiftly capture cropped screenshots without the need for additional software.
- No Third-Party Installation: As it’s a built-in feature, there’s no need to download or install any extra applications, making it convenient for quick captures.
- System Integration: Captured screenshots are directly saved to the desktop, easily accessible for immediate use or further editing.
Cons
- Limited Editing Features: The default method lacks advanced editing tools, limiting customization options such as annotations, blurring, or adding text to the screenshots.
- Precision Challenges: Achieving precise selections may be a bit trickier with only the crosshair cursor for guidance, especially for intricate shapes or areas.
- No Instant Sharing Options: Sharing screenshots may require additional steps, such as manually attaching them to emails or dragging them into other applications.
Method 2: CleanShot X for Advanced Cropped Screenshots
For a more versatile and feature-rich option, consider using CleanShot X (available through Setapp). This software elevates the screenshot game by offering a suite of functionalities beyond the standard Mac capabilities.
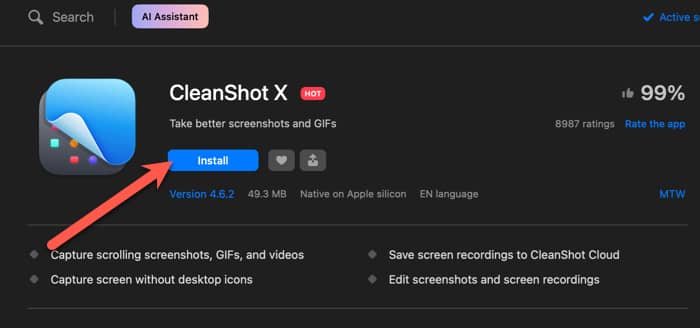
Step 1: Install CleanShot X
Download and install CleanShot X from Setapp, a curated suite of powerful apps for Mac users.

Step 2: Activate CleanShot
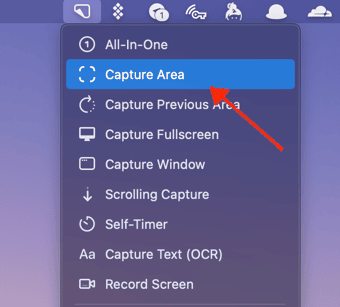
Once installed, open CleanShot X and select the “Capture Area” option as shown in the below screenshot, and select the desired screen area.

The CleanShot X interface provides various tools for capturing, editing, and sharing screenshots.
Step 3: Capture and Customize
Select the specific area you want to capture by using CleanShot’s intuitive interface. Once captured, you can annotate, highlight, blur, or crop the screenshot using the built-in editing tools.
With the help of CleanShot X, you can also take scrolling screenshot on Mac.
Step 4: Save and Share
After customizing the screenshot to your liking, save it to your preferred location or directly share it through CleanShot’s sharing options.
You can also upload it to CleanShot Cloud.
Pros
- Advanced Editing Tools: CleanShot provides a comprehensive suite of editing features, allowing users to annotate, blur, crop, add text, ability to take scrolling screenshots, and highlight specific areas of the screenshot.
- Customizable Workflow: Offers the flexibility to save screenshots in various formats, automatically copy them to the clipboard, or share them directly through preferred platforms.
- Enhanced Precision: CleanShot’s interface aids in precise selections, reducing errors when capturing specific areas of the screen.
Cons
- Requires Installation: CleanShot X needs to be downloaded and installed from Setapp, which might not be preferable for users seeking a lightweight solution without additional software.
- Subscription Model: Setapp operates on a subscription basis, potentially adding ongoing costs for access to CleanShot and other applications. But it has all the useful apps for Mac.
Conclusion
The above 2 methods make grabbing cropped screenshots fast and flexible using either builtin MacOS tools or CleanShotX’s advanced features. But plenty of powerful Mac apps on Setapp can help you do even more with your screenshots.
Whether opting for the default shortcut method or leveraging the advanced capabilities of CleanShot X from Setapp, you now have the tools at your disposal to effortlessly capture and manipulate screenshots with precision.


