
Adding subtitles manually can be one of the most time-consuming parts of editing a video. You have to listen to the audio, type every sentence, place the text at the right point on the timeline, and then adjust the timing so the captions match the speaker.
Movavi Video Editor makes this process considerably easier with its Auto Subtitles feature. Instead of typing captions manually, Movavi can analyze the speech in your video, convert it into text, and place timed subtitles directly on the timeline.
In this tutorial, I’ll show you how to add automatic subtitles to a video using Movavi Video Editor, how to edit and customize the generated captions, and how to export the subtitles as part of your video or as a separate SRT file.
I’ll also share my experience with the automatic subtitle feature after testing it on a real video.
Note: The screenshots in this guide were taken using Movavi Video Editor 2027. The interface may look slightly different if you are using another version.
What Are Automatic Subtitles in Movavi?
Movavi’s Auto Subtitles tool uses speech recognition to convert spoken audio into text.
Instead of creating individual text boxes manually, you can let Movavi:
- Listen to the dialogue in your video
- Convert speech into written text
- Divide the text into subtitle phrases
- Synchronize the captions with the audio
- Place the subtitles automatically on the timeline
You can then review the generated text and correct any words Movavi misunderstood.
The subtitles are also customizable, so you can change their font, position, colors, background, outline, and overall style before exporting your finished video.
This makes the feature particularly useful for:
- YouTube videos
- Tutorials and screen recordings
- Interviews
- Talking-head videos
- Instagram Reels
- TikTok videos
- YouTube Shorts
- Educational videos
- Videos that may be watched without sound
Let’s see how it works.
How to Automatically Add Subtitles in Movavi
The entire process only takes a few steps. If you want to follow along with this tutorial, you can download the Movavi Video Editor trial and try the Auto Subtitles feature using your own video.
Step 1: Import Your Video into Movavi
Open Movavi Video Editor and either start a new project or open an existing one.
Click Add Files and select the video you want to caption.
You can also drag and drop the video directly into Movavi.
Once imported, drag the clip onto the editing timeline if Movavi hasn’t already placed it there.
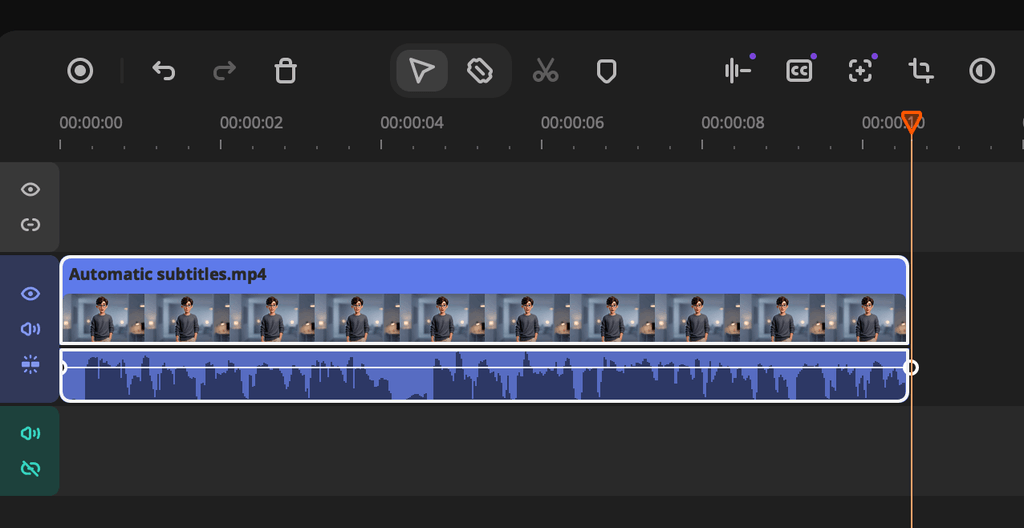
Before generating subtitles, I recommend playing the video for a few seconds to make sure the audio is clear and synchronized correctly.
Clear speech will generally give an automatic transcription system a better chance of recognizing what is being said accurately.
Step 2: Open the Auto Subtitles Tool
With your video on the timeline, go to the Tools section in Movavi.
Select:
Audio → Auto subtitles
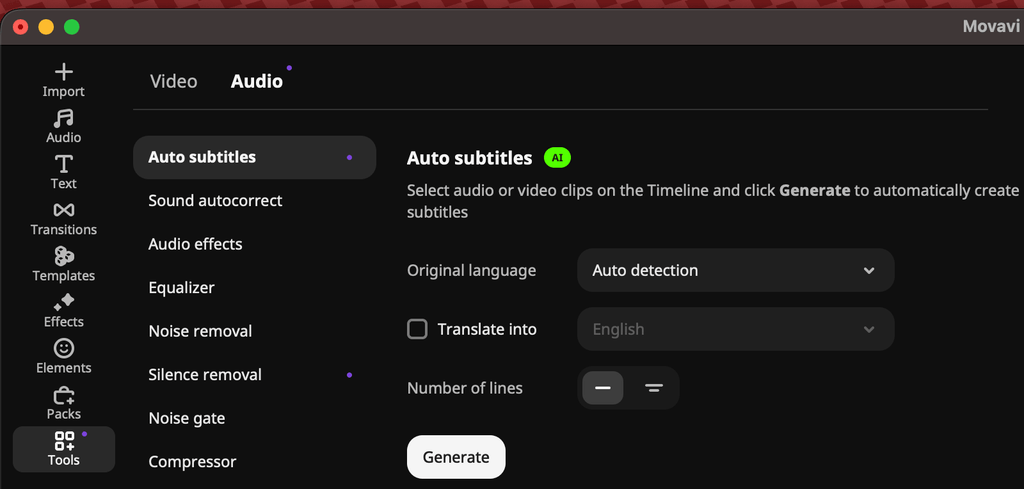
This opens Movavi’s automatic subtitle generator.
Depending on your version and interface layout, you may also see a shortcut for Auto Subtitles elsewhere in the editor.
Step 3: Choose the Spoken Language
Movavi will ask you to specify the language being spoken in your video.
Select the appropriate language from the available options.
If automatic language detection is available in your version, you can also allow Movavi to detect the language.
Choosing the correct spoken language is important because it helps the speech-recognition system interpret the audio correctly.
If your video contains multiple languages or frequently switches between languages, review the generated captions particularly carefully.
Step 4: Generate the Automatic Subtitles
Once you have selected the language, click Generate.
Movavi will begin analyzing the audio and converting the spoken dialogue into text.
Processing time will depend on factors such as:
- Length of the video
- Amount of dialogue
- Audio quality
- Your system and software configuration
- Internet connection if processing requires online services
For my test, I used a video approximately 10 seconds long.
On our 10-second test clip, Movavi generated the subtitles almost instantly—within about a second.
Once processing is complete, you should see individual subtitle sections placed along the timeline.
Step 5: Review the Automatically Generated Captions
Do not export the video immediately after generating the subtitles.
Automatic speech recognition can be very useful, but you should always proofread AI-generated captions.
Movavi provides a Phrases section where you can review the generated text.
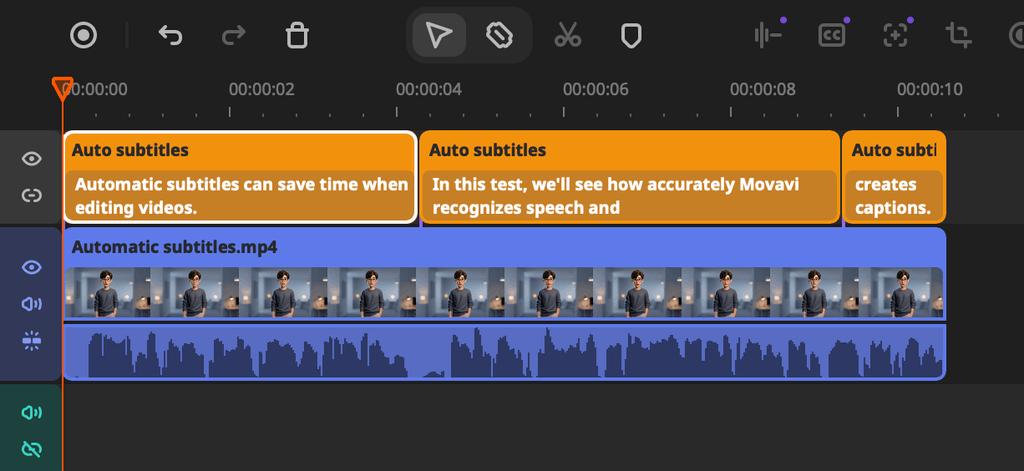
Look particularly closely for mistakes involving:
- People’s names
- Brand names
- Technical terminology
- Abbreviations
- Numbers
- Places
- Words spoken quickly
- Accented speech
- Speech recorded with background noise
If you find a mistake, edit the subtitle text before moving on.
My Movavi Subtitle Accuracy Test
To get a better idea of how well Movavi works in practice, I tested Auto Subtitles rather than relying only on the feature description.
Here are my results:
| Test | Result |
|---|---|
| Video length | 10 sec |
| Language | English |
| Approximate number of spoken words | 21 words |
| Words incorrectly recognized | 100% |
| Processing time | About 1 second or less |
| Background noise | No |
| Manual corrections required | No |
What I noticed
In my 10-second test, Movavi recognized all 21 spoken words correctly, giving it 100% transcription accuracy for this clip. I was particularly interested to see how it handled the word “Movavi,” since brand names can sometimes cause problems for automatic speech recognition, but it identified it correctly.
The subtitles were generated almost instantly, taking about a second or less, and no manual text corrections were needed. The timing also matched the spoken audio well, making the captions usable immediately after generation.
Of course, this was a short test with clear English audio and very little background noise, so longer videos, stronger accents, background music, or noisy recordings may produce different results. Still, for a clean voice recording, Movavi’s Auto Subtitles performed very well in this test.
This is worth testing on your own footage because subtitle accuracy can vary considerably depending on recording quality, microphone quality, speaking speed, pronunciation, and background noise.
Step 6: Change the Subtitle Style
Generating captions is only part of the process. You will probably also want the subtitles to match the style of your video.
Movavi provides subtitle styling options that let you change the appearance of the captions.
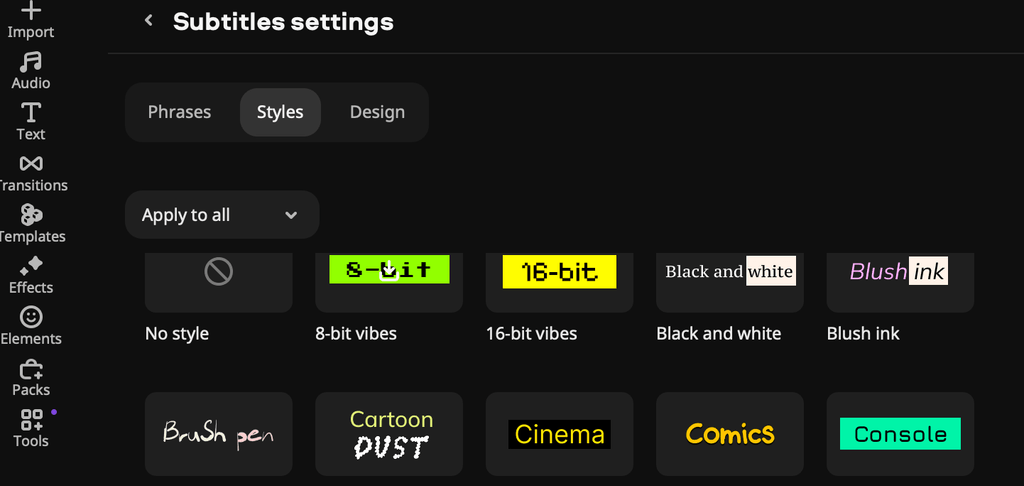
Depending on the selected style and version of Movavi, you can adjust elements such as:
- Font
- Font size
- Text color
- Alignment
- Background
- Outline
- Text emphasis
- Subtitle position
For a normal YouTube tutorial, I generally prefer simple subtitles with strong contrast rather than heavily animated captions.
White text with a dark outline or background, for example, can remain readable against both bright and dark scenes.
For Shorts, Reels, and TikTok videos, you may prefer larger and more visually prominent captions.
How to Highlight the Current Spoken Word in Movavi
Movavi also provides an active-word highlighting option for automatic subtitles. Instead of displaying only static captions, this feature highlights the word currently being spoken, creating the dynamic word-by-word caption style commonly seen in YouTube Shorts, Instagram Reels, and TikTok videos.
You can enable this feature from the Subtitle settings by checking the Highlight active word option.
This can be particularly useful for:
- YouTube Shorts
- Instagram Reels
- TikTok
- Talking-head content
- Podcasts converted into short videos
However, don’t assume that animated captions are always better.
For tutorials, educational videos, and longer YouTube content, traditional captions may be less distracting and easier to follow.
Choose the style based on the type of video you are creating.
How to Change Subtitle Position in Movavi
Subtitle placement is important, especially if you are creating content for different platforms.
Select your subtitles and adjust their position in the preview window or subtitle design settings.
For a traditional horizontal YouTube video, captions are usually placed toward the lower portion of the screen.
For vertical video, be more careful.
Apps such as Instagram and TikTok display interface elements, usernames, descriptions, and buttons around the edges of the screen. Placing subtitles too low can cause them to be partially covered by the app interface.
Always preview your video before exporting it.
How to Edit Subtitle Timing in Movavi
Automatic subtitle generation should place captions in synchronization with the audio, but you may occasionally want to adjust the timing manually.
Look at the subtitle blocks on the timeline.
If a caption:
- Appears too early
- Disappears too quickly
- Remains visible too long
- Is divided at an awkward point
adjust the corresponding subtitle segment on the timeline.
Play that part of the video again after making your changes.
Even small timing improvements can make captions much more comfortable to read.
How to Export a Video With Automatic Subtitles in Movavi
Once you are satisfied with the captions, preview the video from beginning to end.
Check:
- Spelling
- Caption timing
- Text position
- Font size
- Text visibility
- Line breaks
- Names and technical terms
When everything looks correct, click Export.
Choose the video format, resolution, quality, and other export settings you normally use.
For most online videos, MP4 is a convenient option.
Start the export, and Movavi will render the captions into the finished video.
These are often referred to as burned-in subtitles or hardcoded subtitles, because the captions become part of the video image and remain visible during playback.
How to Export Movavi Subtitles as an SRT File
You do not necessarily have to permanently embed the subtitles into the video.
Movavi also lets you export subtitles as an SRT file.
An SRT file contains the subtitle text together with timing information.
This can be useful if you want to:
- Upload captions separately to YouTube
- Keep subtitles optional for viewers
- Edit subtitles with another application
- Create additional language versions
- Archive the transcript separately from the video
To export the subtitle track, select or right-click the subtitle track and choose the Export option for the subtitle file.
Save the resulting .srt file to your computer.
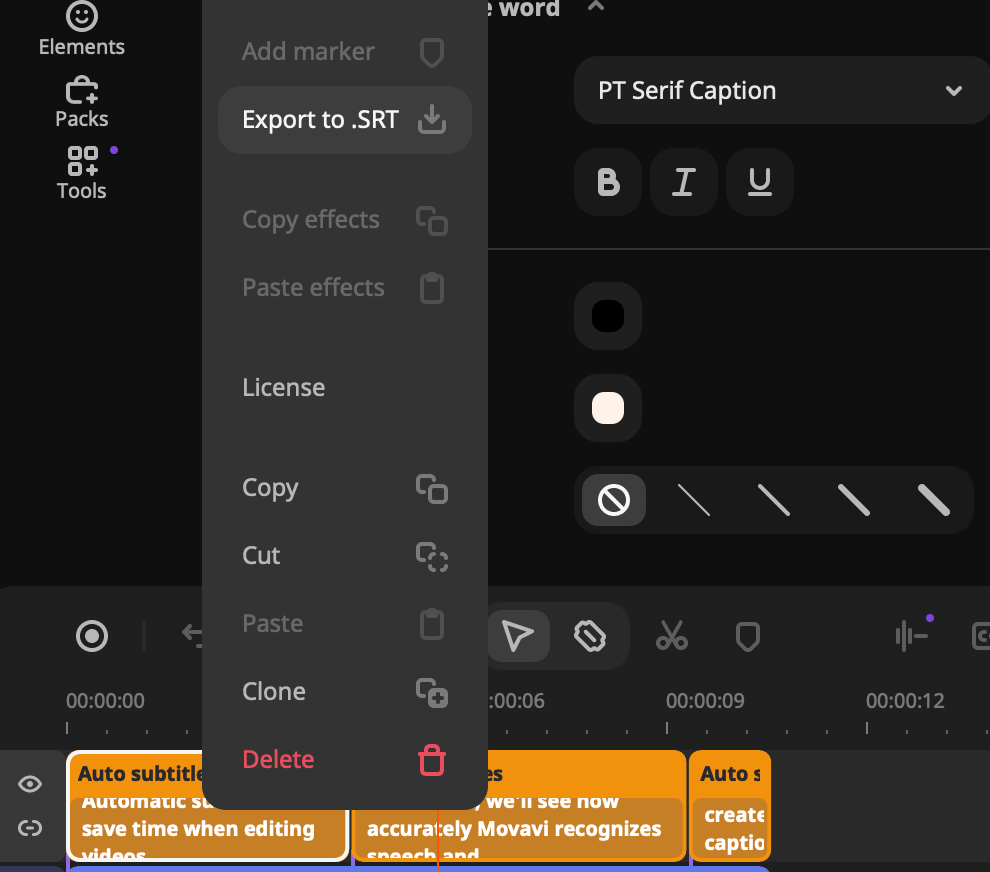
You can then upload the SRT file wherever the platform supports external caption files.
Burned-in Subtitles vs SRT: Which Should You Use?
Both approaches have advantages.
| Burned-in captions | SRT captions |
|---|---|
| Always visible | Can usually be turned on/off |
| Appearance remains exactly as designed | Platform may control appearance |
| Great for Shorts and Reels | Excellent for YouTube and accessibility |
| No separate subtitle file needed | Easy to edit or translate later |
| Become part of the actual video | Stored separately from the video |
For short-form social media videos, I would generally use burned-in captions because they are part of the visual presentation.
For a traditional YouTube video, exporting an SRT can also be useful because viewers can control whether captions are displayed.
Can Movavi Automatically Translate Subtitles?
Movavi’s recent versions include subtitle translation options alongside automatic subtitle generation.
If the translation option is available in your version, you can generate captions from the original speech and then create subtitles in another supported language.
This could be useful if you publish videos for audiences speaking different languages.
However, automatically translated subtitles should also be proofread.
A technically correct translation can still sound unnatural, particularly with conversational speech, idioms, names, or specialized terminology.
Are Movavi Automatic Subtitles Good for YouTube?
Yes, Auto Subtitles can be particularly useful when editing YouTube videos because you can create the captions without leaving your video-editing project.
A typical workflow could look like this:
Edit video → Clean audio → Generate subtitles → Correct captions → Style subtitles → Export video/SRT
Instead of manually transcribing the video in another application and importing the results later, everything can be handled as part of the editing process.
For long YouTube videos, I would strongly consider exporting an SRT file as well.
For YouTube Shorts, burned-in captions with active-word highlighting may make more sense depending on your editing style.
Are Movavi Automatic Subtitles Good for Shorts and Reels?
This is probably one of the most useful applications of the feature.
Many short videos are watched in situations where viewers may not have audio enabled, so having the dialogue displayed on screen helps viewers understand the content immediately.
Movavi’s subtitle styling and active-word highlighting also make it possible to create the more dynamic caption style frequently used in vertical content.
If you are creating a vertical video:
- Use a readable caption style.
- Avoid putting captions too close to the bottom of the screen.
- Keep each subtitle short.
- Use strong contrast between text and video.
- Preview the entire video before exporting.
Don’t overload the screen with text. Captions should support the video rather than becoming the main distraction.
Movavi Auto Subtitles: What I Liked
After testing Movavi’s Auto Subtitles feature, the thing that stood out most was how fast and accurate it was on a clean voice recording.
For my 10-second test clip, Movavi generated the subtitles in about a second or less. More importantly, it recognized all 21 spoken words correctly, including the brand name “Movavi,” which I expected might cause a transcription error.
I also liked how easy it was to review and customize the captions after they were generated. The subtitles appeared directly on the timeline, making it simple to check their timing and edit the text if needed.
Another useful option is Highlight active word, which highlights the word currently being spoken. This creates the dynamic caption style commonly used in YouTube Shorts, Instagram Reels, and TikTok videos.
Overall, the parts I found most useful were:
- Very fast subtitle generation
- 100% transcription accuracy in my clean-audio test
- Accurate recognition of the word “Movavi”
- Easy-to-review subtitle phrases
- Customizable subtitle styles
- Active-word highlighting for short-form videos
- Ability to export subtitles as an SRT file
- A much faster workflow than creating and timing captions manually
For short videos with clear speech, the feature worked smoothly and required no manual text corrections in my test.
What Could Be Better?
There are also a few things worth checking before relying entirely on automatic transcription.
Pay attention to:
- Recognition of names and technical words
- Strong accents
- Multiple speakers
- Background music
- Noisy recordings
- Overlapping dialogue
- Subtitle timing
- Mixed-language conversations
Automatic captions should be treated as a starting point rather than something you publish without checking.
Is Movavi Auto Subtitles Worth Using?
If you regularly create videos with spoken dialogue, Movavi’s Auto Subtitles feature can save a significant amount of time compared with creating captions manually.
Instead of listening to every sentence, typing the text yourself, and synchronizing each caption with the audio, Movavi can generate a complete subtitle track automatically. You can then focus on reviewing the text, adjusting the timing if necessary, and customizing the subtitle style.
One of the biggest advantages is that the entire process happens inside Movavi Video Editor. You can edit the footage, generate subtitles, correct the text, apply styles, enable active-word highlighting, and export the finished video without switching between multiple applications.
In my test, Movavi performed very well. It generated subtitles for a 10-second clip in about a second or less and correctly recognized all 21 spoken words, including the brand name “Movavi.” No manual text corrections were required.
The test used clear English audio with little to no background noise, so results may vary with longer recordings, strong accents, multiple speakers, or noisy audio. Still, based on this test, Movavi Auto Subtitles is fast, accurate, and easy to use.
For creators who regularly make YouTube tutorials, talking-head videos, Shorts, Reels, interviews, or other speech-heavy content, the feature is definitely worth using.
If you want to test the feature yourself, you can download the Movavi Video Editor trial and try Auto Subtitles with your own videos.
Frequently Asked Questions
Does Movavi automatically generate subtitles?
Yes. Movavi Video Editor includes an Auto Subtitles feature that analyzes speech in a video and generates synchronized captions. You can review and edit the generated text before exporting your video.
How do I add automatic captions in Movavi?
Import your video into Movavi Video Editor, open Tools → Audio → Auto subtitles, select the spoken language, and click Generate. After Movavi generates the captions, review the text and customize the subtitle appearance before exporting.
Can I edit automatically generated subtitles in Movavi?
Yes. The automatically generated text can be reviewed and corrected. You can also adjust the subtitle timing and appearance.
Can Movavi export subtitles as an SRT file?
Yes. Movavi can export generated subtitles as an SRT file, allowing you to upload the captions separately to platforms that support subtitle files.
Can I change the font and color of Movavi subtitles?
Yes. Movavi provides subtitle styling and design controls that allow you to customize elements such as the font, text color, background, outline, alignment, and position.
Can Movavi create word-by-word captions?
Movavi includes active-word highlighting for automatic subtitles. When enabled, the word currently being spoken can be highlighted as the video plays, creating a caption style commonly used in Shorts, Reels, and TikTok videos.
Should I check automatic subtitles before exporting?
Yes. Always proofread AI-generated subtitles before publishing. Names, technical terms, accented speech, poor-quality recordings, and background noise can result in transcription errors.
Should I burn subtitles into my video or export an SRT file?
Burned-in subtitles work particularly well for social media videos because they are always visible and retain your chosen design. An SRT file is useful when you want viewers to be able to enable or disable captions, or when uploading separate subtitle tracks to platforms such as YouTube.
Final Thoughts
Creating subtitles manually can take a significant amount of time, particularly on longer videos. Movavi’s Auto Subtitles feature simplifies the process by generating synchronized captions directly from the video’s audio.
The basic workflow is straightforward:
Import your video → Open Auto Subtitles → Choose the language → Generate captions → Proofread → Customize → Export
The automatic generation is only the first step. You should still review the captions carefully, correct transcription mistakes, and make sure the text is easy to read on the devices and platforms your audience uses.
For creators already editing their videos in Movavi, having subtitle generation built into the editor can make captioning much more convenient than creating every subtitle manually.



Leave a Reply