How to Login to your Hostgator Hosting Account using SSH
For many bloggers and website owners, SSH or Secure Shell term may be new but if you are aware of the Linux operating system, then you must be knowing it.
For a newbie, let me give a quick definition of SSH. “SSH is a network protocol for secure data communication” and this data communication takes place via a secure channel.
All hosting account holders in Hostgator.com can use the SSH service for free for one account, whether you have shared web hosting plan or VPS, it doesn’t matter.

Prerequisite for this Tutorial
1. Shell access should be enabled.
2. Knowledge of the Linux operating system and basic commands.
3. SSH tool like Putty or WinSCP for windows operating system.
4. Server IP & SSH Port should be known.
More information on SSH can be get at Wikipedia.org
Recommended Article: Hostgator Hosting Review
Steps to Enable Shell Access to your Hostgator account
There are 2 methods by which you can get your shell access enabled for your Hostgator hosting account. Firstly, just open a ticket for the Hostgator support team asking SSH access.
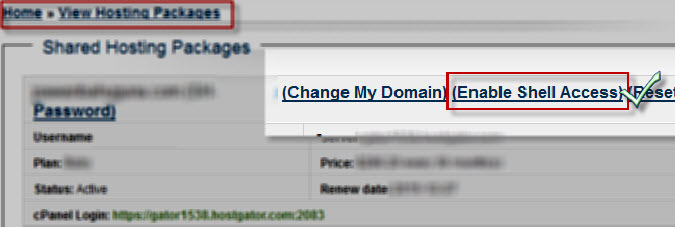
Secondly, you can enable shell access by logging into your Hostgator billing account and going to ‘Hosting Packages‘ and click ‘View Hosting Packages‘. There you will see an option to enable shell access as shown below.

Know your Hosting Account Server IP
The server IP or name is most importantly required to log in via SSH. You will have to login to your Hostgator account to know the server IP, where your account was setup.

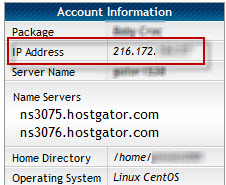
Just go to your account and scroll down and you will see account information. In the account information, your Server name and IP are mentioned, just copy that and you are ready to login to your Hosting account via SSH.
Login to Hosting Server Via SSH
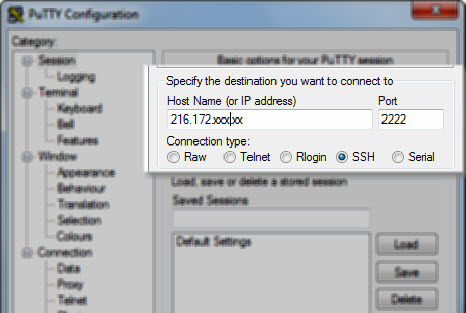
Now as you know your server IP and have enabled the Shell login to your hosting account, now open an SSH tool like putty and put their server name or IP address. By default SSH port is 22 but Hostgator is using 2222 port for shared hosting. So put SSH port accordingly.

After entering all the required details you can click on “Open”, which will open the secure connection between you and your server. It will ask for a fingerprint registry while opening a connection, just click Yes. Now just put your control panel username and password and press enter.
Note: Password will not be shown while typing due to security reasons.

Putty login
Now you will see that you are login to your account home directory. Every user in Linux has its own home directory.

Recommended Article: Basic Linux Commands
Putty login
You can press pwd command to check your present working directory, for current login it will be your home directory i.e. /home/username.
Press ls or ll commands to see a list of files and folders which are present in your home directory as shown in the above image.
All your websites are hosted in public_html. So you can change your directory to that and can see all the sites hosted under it.
Above mentioned method was for windows users, what if you are a Linux or MAC user? Linux and MAC OS users can also connect to their hosting server by using the below steps.
For Linux
To connect to the server, run the following command from a terminal:
ssh -p 2222 [email protected]
For MAC
In MAC, first, you will have to open the terminal by going to Applications → Utilities → Terminal. Now in the terminal use the below command.
ssh -p 2222 [email protected]
So above were the steps to login to your Hosting server via SSH but if you are not familiar with Linux basic commands, then I will suggest you not to login through this method. As one wrong command can remove/delete all your website content from your account.
If you have any questions in mind related to Linux or Hostgator hosting, then feel free to ask. If you like our post please consider sharing it with others.


Nice post. Should have also posted about the ls parameters.
Thanks for reading this post Karma. “ls” parameters detail are posted in our different post.